Clover bootloader has default theme but it seems like sometimes boring but there is a little trick you can customize according to your preference in this article I’m going to sharing with you guys how to customize your clover bootloader theme excited so let’s get started.
Make sure you are using the latest version of clover bootloader just because of clover always comes with the new features might be possible that the previous version of clover bootloader doesn’t have also default clover bootloader theme is an embedded theme which is not changed by the replacing another theme you need to specify theme name in your config.plist file.
A Good Read: Top 5 Gaming Cabinet Under 3000 – Save up to 40% Money

The first thing is you need to download a theme also links are in the description below after that unzip it and provide a name for the
the downloaded theme I call it High Sierra.
Download Theme
https://github.com/hirakujira/High-Sierra-Boot-Theme
Download Clover bootloader
https://sourceforge.net/projects/cloverefiboot/
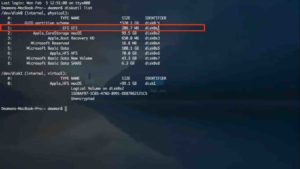
Once You have done that then we need to mount EFI partition for that open terminal and simply type that command shows on your screen in my case my EFI partition name is disk0s1 may be different in your case. also, you can use clover configurator to mount your EFI partition.
-
Here are the commands which used in this tutorial :
1. diskutil list
2. diskutil mount /dev/disk0s1
A Good Read: Best Bluetooth Speakers Under 10000 in May 2021 – Save Up to 40%
After that click on finder select your EFI partition select EFI select clover and select config.plist and open with sublime text editor.
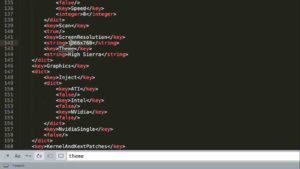
click on find and search for Theme Now you are in the theme section provide your theme name here in my case it is High Sierra. also, you can set resolution once you have done that then click on save.
Now you can customize your theme make sure that background image is in the png format and icons in .icns format also all the assets that you going to change their names are same as the previous one otherwise you must edit their name is theme.plist file to ignore this just uses the same name as the previous one and that’s what I prefer.
Now it’s time restart. So guys, as you can see that theme, is successfully customize

I hope this article is useful for you here a quick video that you can follow 🙂

I would like to introduce myself as Uttam, an Internet Marketing Expert and professional a blogger and founder of Ur Computer Technics. Also, I’m a passionate entrepreneur, SEO Specialist, and fitness freak.